🍥shuma_yoshioka (archived)
はてなブログからエクスポートした内容とりあえずサクッとAndroid JetPack の Navigation Architecture Component を使ってみる
Navigation Architecture Component、使ったらいろいろ楽になった
— 心理的安全性がほしい (@shuma_yoshioka) May 13, 2018
いままでのAndroid開発では、たとえばディープリンクにはGradleからAndroidManifestを書き換える黒魔術を、たとえばルーティングやナビゲーションにはオレオレフレームワークもどきを作って使ってきましたが、Google I/O 2018で発表された Navigation Architecture Component を使うと大変便利でした。
とりあえず使ってみたメモです。
考え方とか構造
- シングルアクティビティ・マルチフラグメント
- 最上位の (唯一の) ActivityがToolbarや ナビゲーション用コントロール(BottomNavigation, NavigationDrawer など) を持つ
- Activityが
NavHostFragmentというのを持ち、そのさらに入れ子でアプリケーションドメインのFragmentが管理・表示される NavHostFragmentが内包するNavControllerというやつがルーティングをしている- Fragmentのinstantiateなどはこれが内部でやってくれる
- ナビゲーション定義はXMLで行い、どのアクションをするかは
R.id.*で指示する - ディープリンクも同上。権威Activityがすべて受け取り、
NavControllerがよしなにルーティングする- を実現するために、navigationのxmlをManifest Mergerがパースし、
intent-filterを書き換える
- を実現するために、navigationのxmlをManifest Mergerがパースし、
作る順序のコツ
各コンポーネントが複雑に絡み合っているので、ゼロから作っていく時は順序にコツがある気がしました。
私の所感としては、
- Gradleに依存書く
- 内包されるFragmentクラスと各レイアウト
res/navigation/*.xmlの定義- Activityを作る
- Fragmentのインタラクションを繋ぎこむ
がスムーズです。
使ってみる
使ってみる。とりあえず「入力された文字をそのまま表示するアプリ」を目指します。
Gradleに依存書く
プロジェクトルートのbuild.gradleへ以下のように書きます。
buildscript {
...
    ext.navigation_architecture_component_version = '1.0.0-alpha01'
...
同ファイルのdependenciesへ以下を追加します。
buildscript {
    ...
    dependencies {
        ...
        classpath "android.arch.navigation:navigation-safe-args-gradle-plugin:${navigation_architecture_component_version}"
        ...
アプリケーションモジュールのbuild.gradle冒頭に以下プラグインを追加します。
...
apply plugin: 'androidx.navigation.safeargs'
...
同じファイルに依存するライブラリを追加します。
dependencies {
...
    implementation "android.arch.navigation:navigation-fragment:${navigation_architecture_component_version}"
    implementation "android.arch.navigation:navigation-ui:${navigation_architecture_component_version}"
...
本質から外れるけれどRelativeLayoutはdon't useでuse ConstraintLayoutらしいので、このサンプルアプリではConstraintLayoutの依存も加えます。
...
    implementation 'com.android.support.constraint:constraint-layout:1.1.0'
...
内包されるFragmentを作る
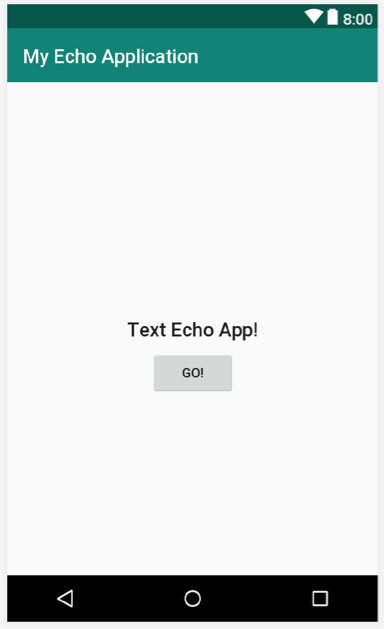
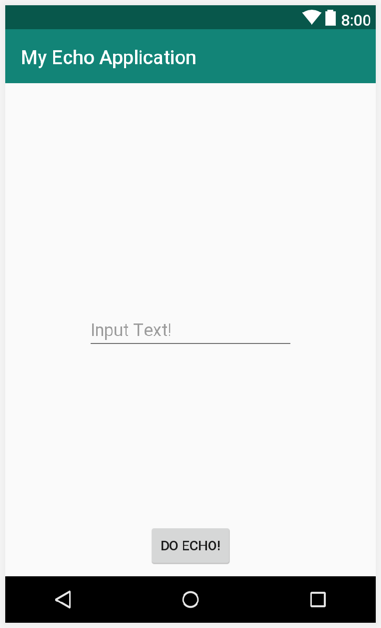
このサンプルアプリでは以下の画面を作ろうかな、
- タイトル画面
- 文字入力画面
- 結果画面 (そのまま文字が表示される)
- バージョン情報画面
これらは一般的なAndroidアプリケーション開発となんら違いが無いので、詳細な解説は飛ばします。
また、画面遷移に関わるボタンクリック時のインタラクション等はこの時点では実装しません。要は、
package jp.s64.android.prototype.myechoapplication

import android.os.Bundle
import android.support.v4.app.Fragment
import android.view.LayoutInflater
import android.view.View
import android.view.ViewGroup

class *Fragment : Fragment() {

    override fun onCreateView(inflater: LayoutInflater, container: ViewGroup?, savedInstanceState: Bundle?): View? {
        return inflater.inflate(R.layout.*_fragment, container, false)
    }

}
程度の記述のみです。
| TitleFragment | InputFragment |
|---|---|
 |
 |
| ResultFragment | AboutFragment |
|---|---|
 |
 |
Google I/Oのサンプルを見る限り、命名規則が従来のfragment_*.xmlやlayout_*.xmlではなく*_fragment.xmlとなっている方がこれからはイケてるみたい。
res/navigation/*.xmlの定義
キモです。resディレクトリでnavigationというディレクトリを作成し、その中に任意の名前のxmlを記述します。私の場合、app_navigation.xmlとしました。
ナビゲーションの対象とするFragmentをひととおり記述します。
<navigation ... >
...
    <fragment
        android:id="@+id/launcher_title"
        android:name="jp.s64.android.prototype.myechoapplication.TitleFragment"
        android:label="@string/title"
        tools:layout="@layout/title_fragment" />

    <fragment
        android:id="@+id/flow_input"
        android:name="jp.s64.android.prototype.myechoapplication.InputFragment"
        android:label="@string/input"
        tools:layout="@layout/input_fragment" />

    <fragment
        android:id="@+id/flow_result"
        android:name="jp.s64.android.prototype.myechoapplication.ResultFragment"
        android:label="@string/result"
        tools:layout="@layout/result_fragment" />

    <fragment
        android:id="@+id/screen_about"
        android:name="jp.s64.android.prototype.myechoapplication.AboutFragment"
        android:label="@string/about"
        tools:layout="@layout/about_fragment" />
...
各要素のandroid:idは遷移先として指定されるものなので、たとえば起動時の画面ならlauncher_*などとするのが良いです。
Aboutが操作フローから独立した画面なので暫定的にscreen_*としましたが、はたして命名のベストプラクティスはなんでしょうか...
android:labelには文字列またはstringリソースが使えます。これはToolbarに表示されるtitleです。
次にルート要素に起動時の初期画面を指定します。
<navigation
    ....
    app:startDestination="@id/launcher_title">
...
TitleからInputへ遷移できるようにします。@+id/launcher_titleのfragment要素内にactionを追加します。
<fragment
        android:id="@+id/launcher_title"
        ... >
    <action
        android:id="@+id/action_launcher_title_to_flow_input"
        app:destination="@id/flow_input" />
</fragment>
同様に、InputFragmentからResultFragmentへ遷移できるようにactionを記述します。
<fragment
        android:id="@+id/flow_input"
        ... >
    <action
        android:id="@+id/action_flow_input_to_flow_result"
        app:destination="@id/flow_result" />
</fragment>
ResultFragmentが入力された文字を受け取れるように、argumentを定義します。
<fragment
    android:id="@+id/flow_result"
    ... >
    <argument
        android:name="input_text"
        android:defaultValue="No Input!"
        app:type="string" />
</fragment>
Activityを作る
MainActivityとでもして作成します。レイアウトは例えば以下のようになります。
<?xml version="1.0" encoding="utf-8"?>
<android.support.constraint.ConstraintLayout
    xmlns:android="http://schemas.android.com/apk/res/android"
    xmlns:app="http://schemas.android.com/apk/res-auto"
    xmlns:tools="http://schemas.android.com/tools"
    android:layout_width="match_parent"
    android:layout_height="match_parent"
    tools:context=".MainActivityActivity">

    <android.support.design.widget.BottomNavigationView
        android:id="@+id/bottomNavigation"
        android:layout_width="match_parent"
        android:layout_height="wrap_content"
        app:layout_constraintBottom_toBottomOf="parent"
        app:layout_constraintEnd_toEndOf="parent"
        app:layout_constraintStart_toStartOf="parent"
        app:menu="@menu/menu_bottom_navigation" />

    <fragment
        android:id="@+id/navHost"
        android:name="androidx.navigation.fragment.NavHostFragment"
        android:layout_width="match_parent"
        android:layout_height="0dp"
        app:defaultNavHost="true"
        app:layout_constraintBottom_toTopOf="@+id/bottomNavigation"
        app:layout_constraintEnd_toEndOf="parent"
        app:layout_constraintStart_toStartOf="parent"
        app:layout_constraintTop_toTopOf="parent"
        app:navGraph="@navigation/app_navigation" />

</android.support.constraint.ConstraintLayout>
ポイントはNavHostFragmentが画面全体を覆っていることと、app:navGraphでさきほどのxmlを指定していること。
BottomNavigationViewまたは (DrawerLayoutで包んだ) NavigationView を使うと、app:menuで指定したメニューからよしなに遷移をしてくれます。
今回つくったres/menu/menu_bottom_navigation.xmlの内容です。
<?xml version="1.0" encoding="utf-8"?>
<menu xmlns:android="http://schemas.android.com/apk/res/android">

    <item
        android:id="@id/launcher_title"
        android:icon="@drawable/ic_home"
        android:title="@string/title"/>

    <item
        android:id="@id/screen_about"
        android:icon="@drawable/ic_info"
        android:title="@string/about"/>

</menu>
こちらのポイントはandroid:idに指定している内容がapp_navigation.xmlの各fragmentのものであること。ここに指定したものを呼び出してくれます。
Activityのコードを書いていきます。以下のようになりました。
package jp.s64.android.prototype.myechoapplication

import android.support.v7.app.AppCompatActivity
import android.os.Bundle
import android.support.design.widget.BottomNavigationView
import androidx.navigation.fragment.NavHostFragment
import androidx.navigation.ui.NavigationUI

class MainActivity : AppCompatActivity() {

    lateinit var navHost: NavHostFragment

    override fun onCreate(savedInstanceState: Bundle?) {
        super.onCreate(savedInstanceState)
        setContentView(R.layout.main_activity)

        navHost = supportFragmentManager
                .findFragmentById(R.id.navHost) as NavHostFragment

        val bottomNavigation = findViewById<BottomNavigationView>(R.id.bottomNavigation)

        NavigationUI.setupActionBarWithNavController(this, navHost.navController)
        NavigationUI.setupWithNavController(bottomNavigation, navHost.navController)
    }

    /*
    override fun onOptionsItemSelected(item: MenuItem): Boolean {
        return NavigationUI.onNavDestinationSelected(item, navHost.navController) || super.onOptionsItemSelected(item)
    }
    */

    override fun onSupportNavigateUp(): Boolean {
        return navHost.navController.navigateUp() || super.onSupportNavigateUp()
        //return NavigationUI.navigateUp(drawer, navHost.navController) || super.onSupportNavigateUp()
    }

}
NavigationUI.setupActionBarWithNavControllerでタイトルなどActionBarを、NavigationUI.setupWithNavControllerでBottomNavigationViewのクリックイベント等をNavHostFragmentの内包するNavControllerと繋ぎ込みます。
onOptionsItemSelectedはActionBarのmenuから直接遷移させる時用の記述です。必要に応じてコメントアウトしてください。
onSupportNavigateUpはActionBarでupした際に画面スタックをpopさせるために必要です。また、Drawerを利用する場合はコメントアウトしてあるような記述を用いることで可能です。
Fragmentのインタラクションを繋ぎ込む
各画面のボタンクリック等を繋ぎます。
TitleFragmentは単に以下のような記述を追加すれば十分です。
    override fun onViewCreated(view: View, savedInstanceState: Bundle?) {
        super.onViewCreated(view, savedInstanceState)
        view.findViewById<Button>(R.id.button).setOnClickListener(Navigation.createNavigateOnClickListener(R.id.action_launcher_title_to_flow_input))
    }
createNavigateOnClickListenerには遷移先fragmentのidではなく、actionのidを指定しているのがポイントです。
対しInputFragmentでは次の画面へ値を渡す必要があります。今回の場合は以下のように記述できます。
    override fun onViewCreated(view: View, savedInstanceState: Bundle?) {
        super.onViewCreated(view, savedInstanceState)

        val editText = view.findViewById<EditText>(R.id.editText)

        view.findViewById<Button>(R.id.button2).setOnClickListener {
            Navigation.findNavController(it).navigate(
                    R.id.action_flow_input_to_flow_result,
                    ResultFragmentArgs.Builder()
                            .setInput_text(editText.text.toString())
                            .build()
                            .toBundle()
            )
        }
    }
ResultFragmentArgsはnavigation-safe-args-gradle-pluginが自動生成しているもので、navigationのxmlに記述した内容が元になっています。
同様に、ResultFragmentでも渡された値を表示できるようにします。
    override fun onViewCreated(view: View, savedInstanceState: Bundle?) {
        super.onViewCreated(view, savedInstanceState)

        val args = ResultFragmentArgs.fromBundle(arguments)

        view.findViewById<TextView>(R.id.textView).text = args.input_text
    }
以上で基本的な機能の実装は完了です。
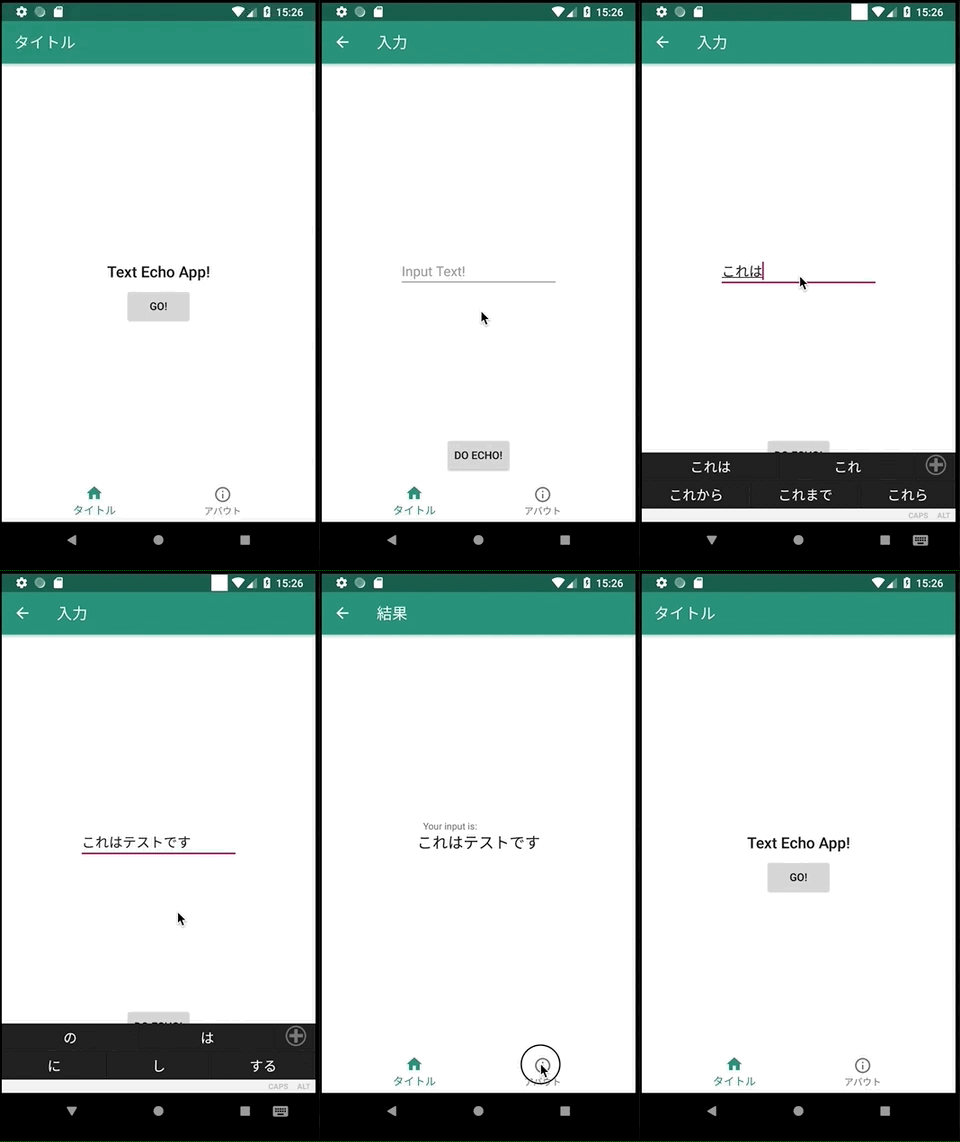
らくちん!
ディープリンク対応
app_navigation.xml内のfragment要素に、以下のように記述します。今回はaboutに対応するリンクにしました。
<fragment
    android:id="@+id/screen_about"
    ... >

    <deepLink app:uri="http://example.com/about"/>

</fragment>
AndroidManifest.xmlのActivity内に、以下のように記述します。
...
<activity android:name=".MainActivity">
    ...
    <nav-graph android:value="@navigation/app_navigation"/>
    ...
</activity>
...
以上で完了です。
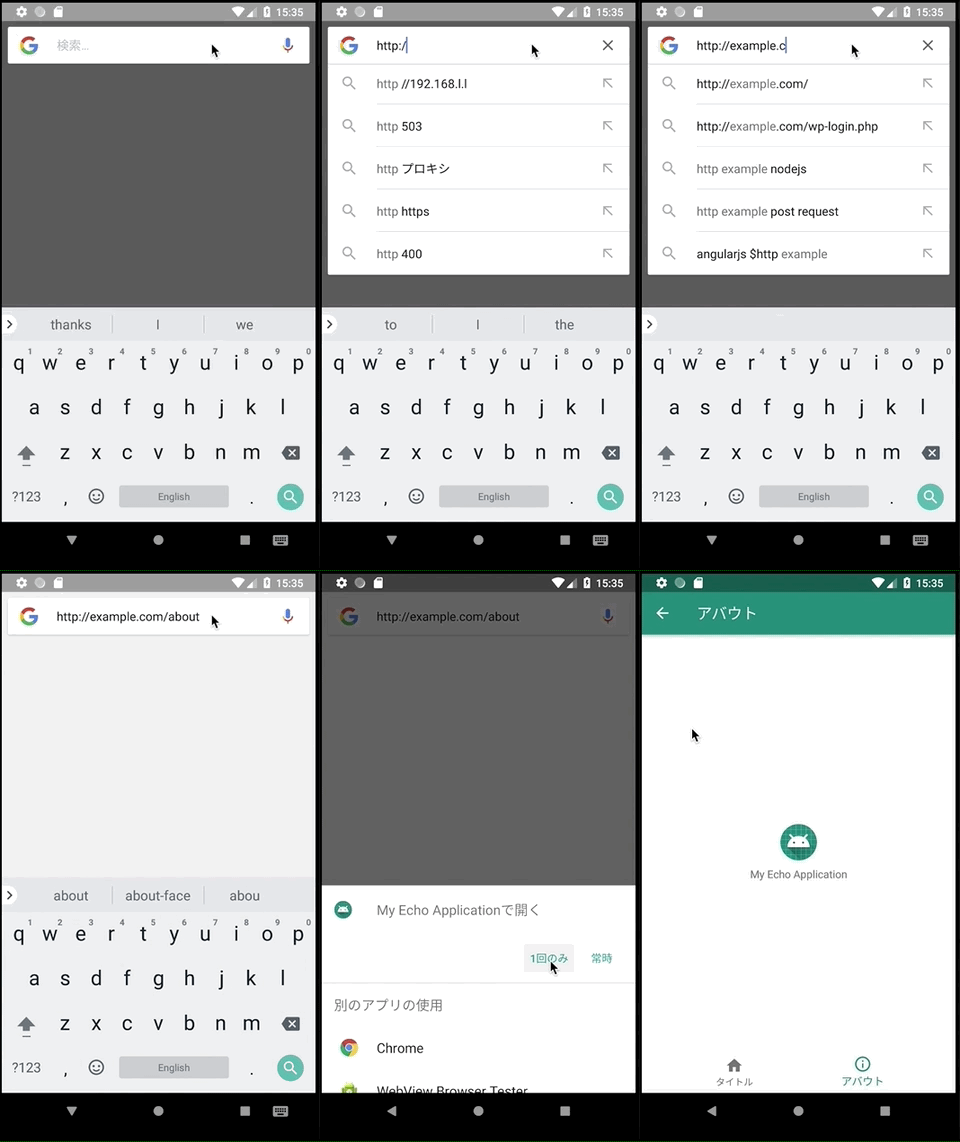
らくちん!
所感
よさそう
※ 今回のコードはこちらに置きました